

In the following article I am going to demonstrate how you can exploit file upload vulnerability and upload malicious code on the server.
(Not related to the tutorial: Please note that I am myself new to the vast world of ethical hacking and whatever I write is nothing but my tiny contribution to educate other people about cyber security)
With that being said, let’s begin.
I am assuming you know what DVWA is. In case you don’t, DVWA stands for Damn Vulnerable Web Application and it is what it sounds like — damn vulnerable! It is designed to be hacked and is used to test common web application threats without breaking any laws. To know more about this visit this link.
Open the DVWA login page in your browser and enter your login username and password (default admin: admin)
 First go the DVWA security tab and make sure the security is set to ‘medium’. Now, go the upload section. The interface is self explanatory. Click browse to select an image file to upload and click upload.
Before we do that let’s create our ‘image’ file. Open Leafpad( or any text editor) and type in the following:
First go the DVWA security tab and make sure the security is set to ‘medium’. Now, go the upload section. The interface is self explanatory. Click browse to select an image file to upload and click upload.
Before we do that let’s create our ‘image’ file. Open Leafpad( or any text editor) and type in the following:
 It is a simple html file which contains a script to open up a dialog box saying ‘You have been hacked’. Now save the file as [name].html.[image extension]. For example, I saved mine as ‘hack.html.jpg’.
Go back to DVWA and select this file using browse.
It is a simple html file which contains a script to open up a dialog box saying ‘You have been hacked’. Now save the file as [name].html.[image extension]. For example, I saved mine as ‘hack.html.jpg’.
Go back to DVWA and select this file using browse.
 Now before we click on upload, we need to fire up Burp Suite. It is a software which contains a lot of tools to test web applications. To get Burp Suite, follow this link.
Here is the explanation behind using Burp Suite for this tutorial: When we click on upload button the application checks for the extension of the file that we are uploading. If the extension is jpg, png, bmp etc., the file gets uploaded. We have passed this test but uploading the file to the server isn’t the only thing we are interested in. We have to make sure it gets executed in the remote server. In this case if we upload our file without any tampering on its way to the server then it will be uploaded as a non executable.
Burp Suite places itself in the middle between the client and the server allowing us to view and modify the requests being sent to the server.
In your browser (Firefox in my case) in preferences, search for the keyword ‘proxy’. Click on the network and proxy tab and change your proxy settings to manual. In our case Burp Suite is the proxy. By default Burp Suite operates in the following address- 127.0.0.1:8080. So in the browser, set the IP address as 127.0.0.1 and the port as 8080.
In Burp Suite, under the proxy tab, make sure that intercept mode is on.
Now before we click on upload, we need to fire up Burp Suite. It is a software which contains a lot of tools to test web applications. To get Burp Suite, follow this link.
Here is the explanation behind using Burp Suite for this tutorial: When we click on upload button the application checks for the extension of the file that we are uploading. If the extension is jpg, png, bmp etc., the file gets uploaded. We have passed this test but uploading the file to the server isn’t the only thing we are interested in. We have to make sure it gets executed in the remote server. In this case if we upload our file without any tampering on its way to the server then it will be uploaded as a non executable.
Burp Suite places itself in the middle between the client and the server allowing us to view and modify the requests being sent to the server.
In your browser (Firefox in my case) in preferences, search for the keyword ‘proxy’. Click on the network and proxy tab and change your proxy settings to manual. In our case Burp Suite is the proxy. By default Burp Suite operates in the following address- 127.0.0.1:8080. So in the browser, set the IP address as 127.0.0.1 and the port as 8080.
In Burp Suite, under the proxy tab, make sure that intercept mode is on.
 In the DVWA page, click on the upload button.
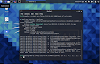
You will get the following as the output in Burp Suite.
In the DVWA page, click on the upload button.
You will get the following as the output in Burp Suite.
 In the parameter filename(as highlighted in the image) change ‘hack.html.jpg’ to ‘hack.html’ and click forward.
 If you go the DVWA page you will get a message saying the file was uploaded successfully and to make things simple, the path of the uploaded file is also given (in the real world scenario things won’t be this simple).
 If we go the said location we will get a list of files that have been uploaded including our file as well.
 Click on hack.html and the dialog box saying ‘You have been hacked’ opens up.
 We have successfully exploited the file upload vulnerability of our web application.
We used a simple script that opens up alert dialog box. Instead of that we can upload some real malicious code to delete or modify the contents on the server or even create a persistent backdoor. The link to the uploaded file can be sent to the client so that the file is executed on his browser. This can enable us to create a backdoor on client side as well.
The thing to remember is that the file should be executable and the rest is up to your creativity.
We have successfully exploited the file upload vulnerability of our web application.
We used a simple script that opens up alert dialog box. Instead of that we can upload some real malicious code to delete or modify the contents on the server or even create a persistent backdoor. The link to the uploaded file can be sent to the client so that the file is executed on his browser. This can enable us to create a backdoor on client side as well.
The thing to remember is that the file should be executable and the rest is up to your creativity.


0 Comments