

Another day, another Flask tutorial. Today I brought you a useful skill to
learn and walk one step closer to Flask mastery. Let’s get right to it.

Objective
Flask Directory Structure

By default, Flask uses directories with specific names for different
purposes as demonstrated below:
static: as evident from the name it is used to keep all static
files such as CSS files.
templates: this folder is used to keep HTML files that is to be
rendered or served to the client. These HTML files can be static or
dynamic by using jinja templating language, more on that later.
main.py: this is the python file where the Flask module is
initialized. I went with the plain old ‘main.py’ but you can name it
anything you like but just don’t name it ‘flask.py’, because the Flask
module already uses it.

venv , __pycache__ : these folders and files are the virtual
environment dependencies that we already had setup in Part 1 of this
series.
If you haven’t already checked out ‘Flask for dummies part 1’ then first go and check it out.
Jinja Templating Language
Flask leverages Jinja2 as its template engine. You are obviously free to use a different template engine, but you still have to install Jinja2 to run Flask itself. This requirement is necessary to enable rich extensions. An extension can depend on Jinja2 being present.A template contains variables which are replaced by the values which are passed in when the template is rendered. Variables are helpful with the dynamic data.
Delimiters
- {%....%} are for statements
- {{....}} are expressions used to print to template output
- {#....#} are for comments which are not included in the template output
- #....## are used as line statements
HTTP (Hyper Text Transfer Protocol)
HTTP is an application level networking protocol which defines a set of rules to share/transfer data (HTML, media etc.) across the internet. A web application used this protocol to access all types of data that it needs to from the server and the server also sends responses in same format. This protocol provides 4 basic methods or techniques to access/share data – GET, POST.GET: This HTTP type is used to access data from servers which is mostly static. For example a login page. Any personalized data or endpoint that the user wants to send or access respectively is directly added into the URL being accessed that is, it provides dynamism by the usage of different types of URL. It is less secure as data is appended to the URL.
Building a Login System
I am assuming that you have already set up your flask environment, if
not check our previous article by clicking the following link :
Click Here
Let’s dive into some Code:
Checkout our GitHub repository for this tutorial: Flask for dummies part 2
First, we are going to make some HTML files.

Line 5: jinja templating language is used to add dynamic and
static content to the template. The ‘url_for’ function is provided by
flask which takes two parameters, static folder name and the filename
to access. This method provides a valid url to access the requested
file and the template is passed to another function ‘render_template’
to render jinja templates and flask methods. Finally a pure HTML is
served to the client.
Note, the structure of the form is very crucial for the
working of this Login system. The ‘name’ attribute is the field by
which our Flask Backend will identify the various details/login
details sent to the server.

Line 8: ‘style2.css’ is required which is accessed by the url
resolved by ‘url_for’
Line 12 – 15: jinja template used to access data sent to the template by passing parameters to the render_template method.

Not too shabby, check out our GitHub repository for more info.
This is a basic HTML template, feel free to go crazy.

Line 1: Python style of importing modules.
Line 2: After importing Flask, now it’s time to initialize it
by passing ‘__name__’ which is a predefined keyword.
Line 4: When building a login system, we require valid
credentials to check against submitted credentials. Mostly a database
is used for storing user data but here we have made a python list for
simplicity.
Line 16: List which will contain usernames of all logged in
users.
Line 18: Function that take username and password as parameters and check for the validity against the user credentials (db) list.


Line 29, 33, 44: Functions that define the type of services and responses the endpoint (defined by the decorators) is providing.
- index: This function is only used to send login form to the client.
- login: This function receives the form data (username and password) sent by the user and process it that is, check for validity. Flask provides a ‘request’ object that can be used to access data sent by the client using HTTP POST protocol. To restrict HTTP GET traffic, keyword argument ‘methods’ is specified in the decorator on line 32
- dashboard: This function is executed on successful login that is, when credentials are valid and the client is directed to the ‘/dashboard/<username>’ endpoint. This endpoint is special in the sense that it is dynamic. The syntax ‘<username>’ is used to specify that the endpoint parameter at this position is passed as a keyword argument ‘username’ to the dashboard function. We have passed two keyword arguments to the 'render_template' method, which are accessed by using Jinja2 templates which exactly what I have done in 'dashboard.html'.
Line 56: The if statement checks if this ‘main.py’ file is
used as a module or a package, when ‘__name__’ keywords value equals
‘__main__’ it means this respective file is a module that is being
executed. If the condition is true, execute the flask app using the
run method.
Remember I told you that the name attribute of the form is very
important, the key used for accessing request.form fields is same as
the name attribute set in the HTML from.
render_template: Note this method always searches the
respective files in the 'templates' directory unless specified
otherwise.
redirect: This method is used to redirect the user to a different endpoint. Therefore if the user enters wrong credentials, the user is redirected to the root endpoint or the login page else the user is redirected to dashboard.
We are done with the coding part and now it’s time to test it.
Running the Server
Execute the following commands to Run the flask server:
Windows:
set FLASK_APP=main.pypython -m flask run
Linux:
export FLASK_APP=main.py
python -m flask run
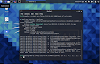
If the following output logs on your terminal , you are good to go.
Go
to the Endpoint logged in the terminal and enjoy.

End Result
This is the final result : *Note the url*

|
| / |

|
|
Form submitted to /login |

|
| /dashboard/John |
If you have reached this far, I hope you have learned something today.
Follow our blog if you haven't already for more such informative articles.
Connect with me on LinkedIn


0 Comments